Table of Contents
Containers and microservices are at the heart of modern apps, and network connectivity keeps applications running successfully. In this article, you will learn what bridge networks and overlay networks are, and how they differ. I will also show practical usage examples for each of them. Since the topic is extensive, I divided it into two parts. In the next article, I will discuss IPvlan networks and Macvlan networks in detail. Let’s start with the first part!
The Container Network Model and Architecture
So, I will talk about the network model Docker employs, and then I will mention some network topologies and how they are implemented.
The Docker network is based on a design specification called the Container Network Model (CNM). The CNM specification includes three major parts: sandboxes, endpoints, and networks. Sandboxes are basically a network namespace, so every container on a host shares the host’s kernel. Inside every container is actually a collection of namespaces. In fact, it is a little bit like a virtual machine. So, if you know that a virtual machine is a collection of virtual CPUs, virtual RAM, virtual disks, network cards and many others, a container is a collection of namespaces. The sandbox is a ring‑fenced area of the host. It consists of an operating system where the container’s Ethernet interface works with IP, DNS config, routing table and port list.
Linux operating systems can implement sandboxes. This is usually done by using a network namespace. The endpoint part connects the sandbox in the container to the network – usually a virtual Ethernet interface. Essentially the network is just a group of these endpoints that can communicate.
Single-host Bridge Networks
Docker Bridge Networks: Local Scoping and Network Security
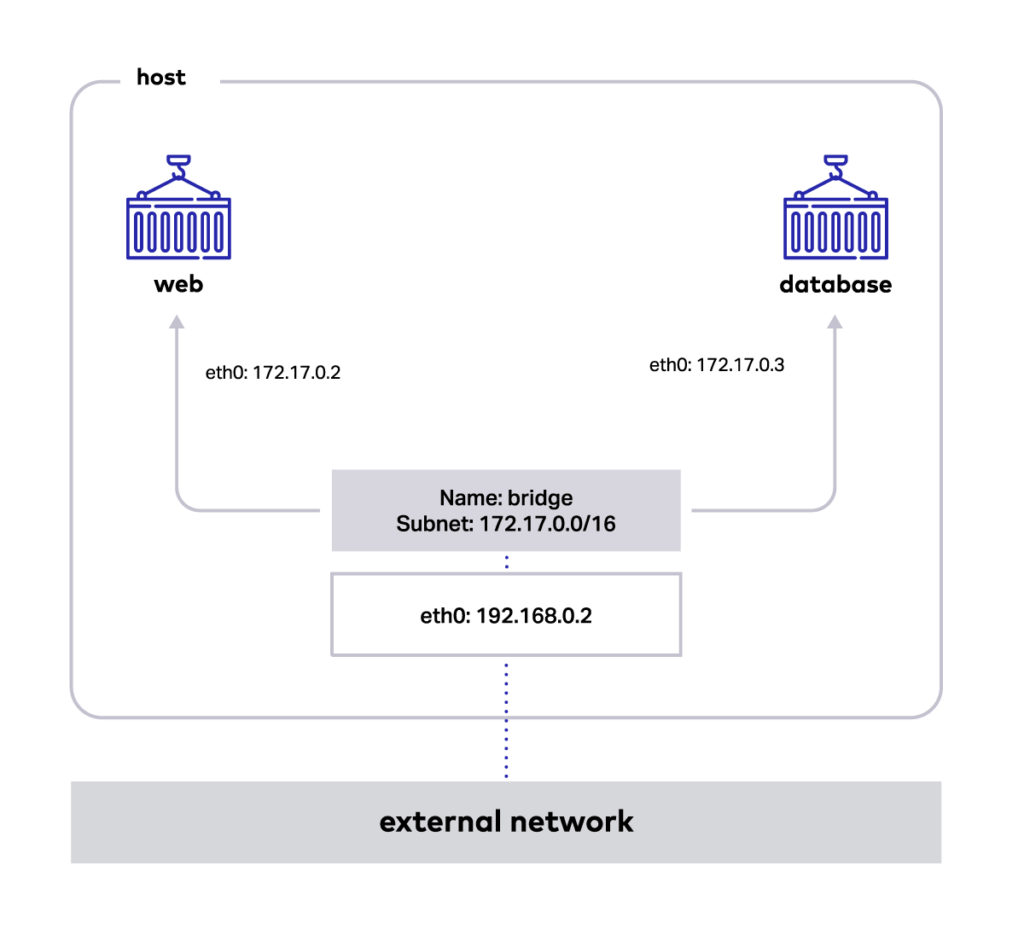
First we’ll discuss bridge networks, which are always on a single host. They are built with the bridge driver and are scoped locally. External access is granted by exposing ports to containers. Docker secures the network by managing rules blocking connectivity between different networks. Docker Engine creates the necessary Linux bridges, internal interfaces, IPtable rules, and host routes to make this connectivity possible. A built-in IPAM driver provides the container interfaces with private IP addresses from the subnet of the bridge network.

Docker Bridge Network for Container Communication
The above application is now being run on our host. The Docker bridge allows the web to communicate with the database by its container name. The two containers recognize each other automatically because they are on the same network. The networking driver handles all port mapping, security rules, and pipework between Linux bridges, as containers are scheduled and rescheduled across a cluster.
To check the details of the bridge network, execute the command as follows: docker network inspects the bridge. This command returns information about one or more networks. By default, this command renders all results in a JSON object. In the results, we also see containers that are connected to the network.
[
    {
        "Name": "bridge",
        "Id": "6da57f185f909934e1a56af640bb67f2faba153ff5d772c021268ba43d48513e",
        "Created": "2023-03-14T12:33:36.20454625Z",
        "Scope": "local",
        "Driver": "bridge",
        "EnableIPv6": false,
        "IPAM": {
            "Driver": "default",
            "Options": null,
            "Config": [
                {
                    "Subnet": "172.17.0.0/16",
                    "Gateway": "172.17.0.1"
                }
            ]
        },
        "Internal": false,
        "Attachable": false,
        "Ingress": false,
        "ConfigFrom": {
            "Network": ""
        },
        "ConfigOnly": false,
        "Containers": {
            "bda12f8922785d1f160be70736f26c1e331ab8aaf8ed8d56728508f2e2fd4727": {
                "Name": "web",
                "EndpointID": "0aebb8fcd2b282abe1365979536f21ee4csaf3ed56177c628eae9f706e00e019",
                "MacAddress": "02:42:ac:11:00:02",
                "IPv4Address": "172.17.0.2/16",
                "IPv6Address": ""
            },
            "f2870c98fd504370fb86e59f32cd0753b1ac9b69b7d80566ffc7192a82b3ed27": {
                "Name": "database",
                "EndpointID": "a00676d9c91a96bbe5bcfb34f705387a33d7cc365bac1a29d4e9728df92d10ad",
                "MacAddress": "02:42:ac:11:00:01",
                "IPv4Address": "172.17.0.3/16",
                "IPv6Address": ""
            }
},
        "Options": {
            "com.docker.network.bridge.default_bridge": "true",
            "com.docker.network.bridge.enable_icc": "true",
            "com.docker.network.bridge.enable_ip_masquerade": "true",
            "com.docker.network.bridge.host_binding_ipv4": "0.0.0.0",
            "com.docker.network.bridge.name": "docker0",
            "com.docker.network.driver.mtu": "1500"
        },
        "Labels": {}
    }
]
Multi-host Overlay Networks
Overlay Networks for Applications Scaling
Multi‑host overlay networking. This is an interesting solution because the single‑host bridge stuff we have just discussed is often insufficient. For example, if you’re running your containerized apps on more than a single Docker host (and that’s pretty much every app these) days, you need a multi‑host overlay network.
The overlay network driver creates a distributed network among multiple Docker daemon hosts. This network overlay sits on top of the host-specific networks, allowing containers connected to it to communicate securely when encryption is enabled. Docker transparently handles each packet’s routing to and from the correct Docker daemon host and the correct destination container.
Docker Overlay Networking for Distributed Apps
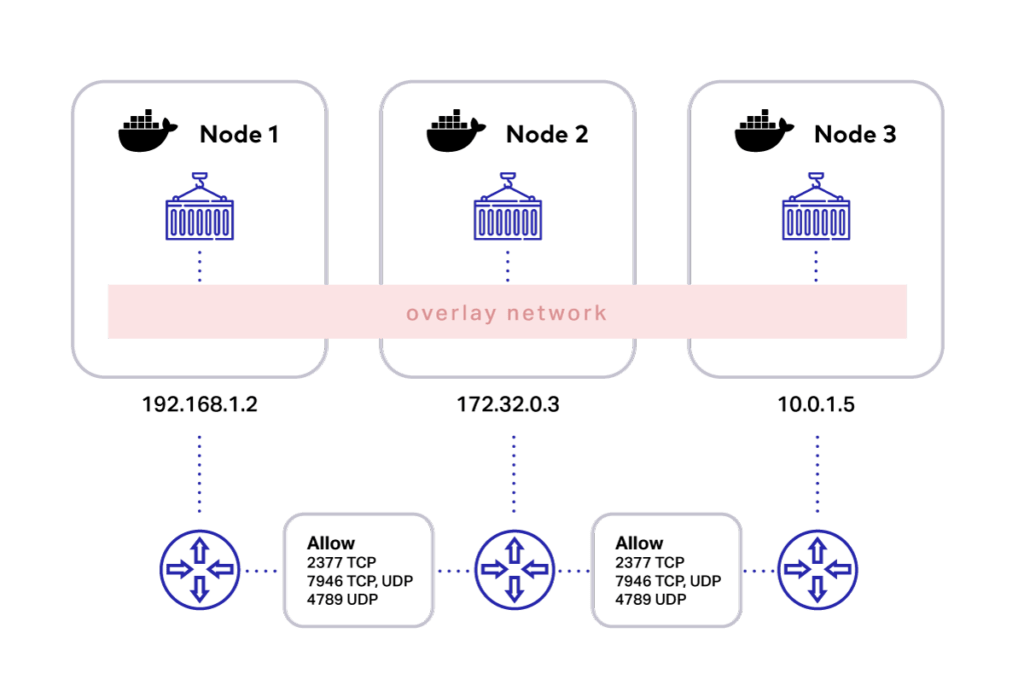
Let’s imagine three Docker hosts on three networks connected to routers, and the ports: 2377,7946 and 4789 are open on any intermediary firewalls. This means they could be on different networks, either in the same data centre or availability zone or they could even be in different availability zones and regions. And as long as these ports are open, communication works. You might have to consider latency if they’re pretty far apart from each other, but apart from latency, it’s ok. Putting all this together is as simple as the Docker network creating and specifying the overlay driver, and that’s it. You will get a single layer 2 network spanning multiple hosts. Then you deploy application containers.
Now, because it’s the second layer in a single network broadcast domain, all ports are open, and the traffic flows freely. So, three containers here run on different hosts, but because they’re on the same overlay network, they can communicate without having to map ports on the host. And this is fabulous!
I’ve added a picture below to help you visualize the situation I’m talking about.

There are two essential things to keep in mind when creating an overlay network:
1. Firewall rules for Docker daemons using overlay networks.
You need the following ports to be open to traffic from and to each Docker host participating in an overlay network:
- TCP port 2377 for cluster management communications
- TCP and UDP port 7946 for communication among nodes
- UDP port 4789 for overlay network traffic
2. Initialize Docker daemon as a swarm manager
You need to either initialize your Docker daemon as a swarm manager using docker swarm init or join it to an existing swarm using docker swarm join. Either of these creates the default ingress overlay network, which swarms services use by default.
Conclusion
Okay, we’ve come a long way. We started with single‑host bridge networks. This is the simplest default network driver. Bridge networks are usually used when your applications run in standalone containers that need to communicate. Then, if you want to expose an app to the outside world, or just to another Docker node, you need to map ports on the host. After that, we looked at the multi‑host overlay network, which is an interesting case. Overlay networks connect multiple Docker daemons and enable swarm services to communicate with each other. This strategy eliminates the need to do OS-level routing between these containers.
Next, in the second part of this article, we will look at the Macvlan network, which is quite helpful in apps that need their very own MAC addresses on existing networks and VLANs. We’ll also talk about IPvlan which, without going into detail, looks just like a Macvlan network. So, it’s also about connecting to existing VLANs again, only this time, the containers don’t get their own MAC addresses, just IPs.
One of the key benefits of using an overlay network is that it allows containers running on different hosts to communicate seamlessly without having to map ports on the host. This is truly fabulous and makes managing complex microservices architectures much easier.


